
Cert-manager
Cert-manager adds certificates and certificate issuers as resource types in Kubernetes clusters and simplifies obtaining, renewing, and using those certificates.
It can issue certificates from various supported sources, including Let’s Encrypt, HashiCorp Vault, Venafi, and private PKI.
This tool supports certificate issuance from various sources, including Let’s Encrypt, HashiCorp Vault, Venafi, and private PKI systems.
Lets Encrypt
In this guide, we will focus on using Let’s Encrypt, a renowned, free, automated, and open Certificate Authority that issues digital certificates for HTTPS encryption. Known for its straightforward setup and broad browser compatibility, Let’s Encrypt is operated by a non-profit organization and advocates for secure web connections, although it does impose rate limits on certificate issuance.
ACME
We will configure cert-manager to procure a TLS certificate from Let’s Encrypt employing the ACME protocol. The ACME protocol facilitates Let’s Encrypt in verifying your authority over the domain names listed in your certificate request. This is done through a “challenge” process that necessitates specific verifiable modifications either on your website or DNS records
-
DNS-01 challenge - you need to create a DNS
TXTrecord for your domain. This record should contain a unique token and a fingerprint of your account key, and it’s placed at_acme-challenge.<YOUR_DOMAIN>. -
HTTP-01 challenge - either you or your ACME client must generate a file on your web server. This file should include a unique token and a fingerprint of your account key. Successfully doing this proves your control over the website to the Certificate Authority (CA). A key benefit of the HTTP-01 challenge is its ease of automation on widely used web server platforms like Nginx, which is part of our setup process.
In this deployment, we will be configuring the DNS01 Challenge and using Cloudflare as my DNS01 provider. This method offers two significant advantages:
- It eliminates concerns about firewalls, load balancers, proxies, or similar elements that might interfere with HTTP validation.
- It enables the request of wildcard certificates through DNS01 validation.
The HTTP01 Ingress solver. This is not covered here, and you can see my written instructions to do that here in Install Cert Manager and validate certificates with HTTP01 Ingress
Installation
Install cert-manager with helm
Follow the Cert-Manager Helm install instructions for in-depth instructions. Here is a rundown:
- Add the helm repo for cert-manager
helm repo add jetstack https://charts.jetstack.io
helm repo update
- Install
cert-managerusing helm (you can specify a specific version or omit the version flag for the latest)
export VERSION=v1.15.1
export NAMESPACE=cert-manager

helm upgrade \
    cert-manager \
    jetstack/cert-manager \
    --install \
    --namespace $NAMESPACE \
    --create-namespace \
    --version $VERSION \
    --set "crds.enabled=true"
IF you get the following error, you can run without the --set installCRDs=true flag
Error: Unable to continue with install: CustomResourceDefinition "certificaterequests.cert-manager.io" in namespace "" exists and cannot be imported into the current release: invalid ownership metadata; annotation validation error: key "meta.helm.sh/release-name" must equal "cert-manager": current value is "sealed-secrets"; annotation validation error: key "meta.helm.sh/release-namespace" must equal "cert-manager": current value is "kube-system"
Create the CloudFlare DNS issuer
To create a new Issuer, first, make a Kubernetes secret containing your new API token or API key
To use [Cloudflare](https://www.cloudflare.com, you may use one of two types of tokens. API Tokens allow application-scoped keys bound to specific zones and permissions, while API Keys are globally scoped keys with the same permissions as your account.
To create a new Issuer, begin by crafting a Kubernetes secret that encompasses your newly generated API token or API key.
When opting for Cloudflare as the DNS issuer, you can choose between two token options:
- *API Tokens are designed for application-level scope, tethered to particular zones and specific permissions.
- On the other hand, API Keys possess a global scope, offering permissions that mirror the full capabilities of your account.
Recommended: Create a Secret with our Cloudflare API token
For more details, See Cloudflare acme setup from cert-manager documentation.
-
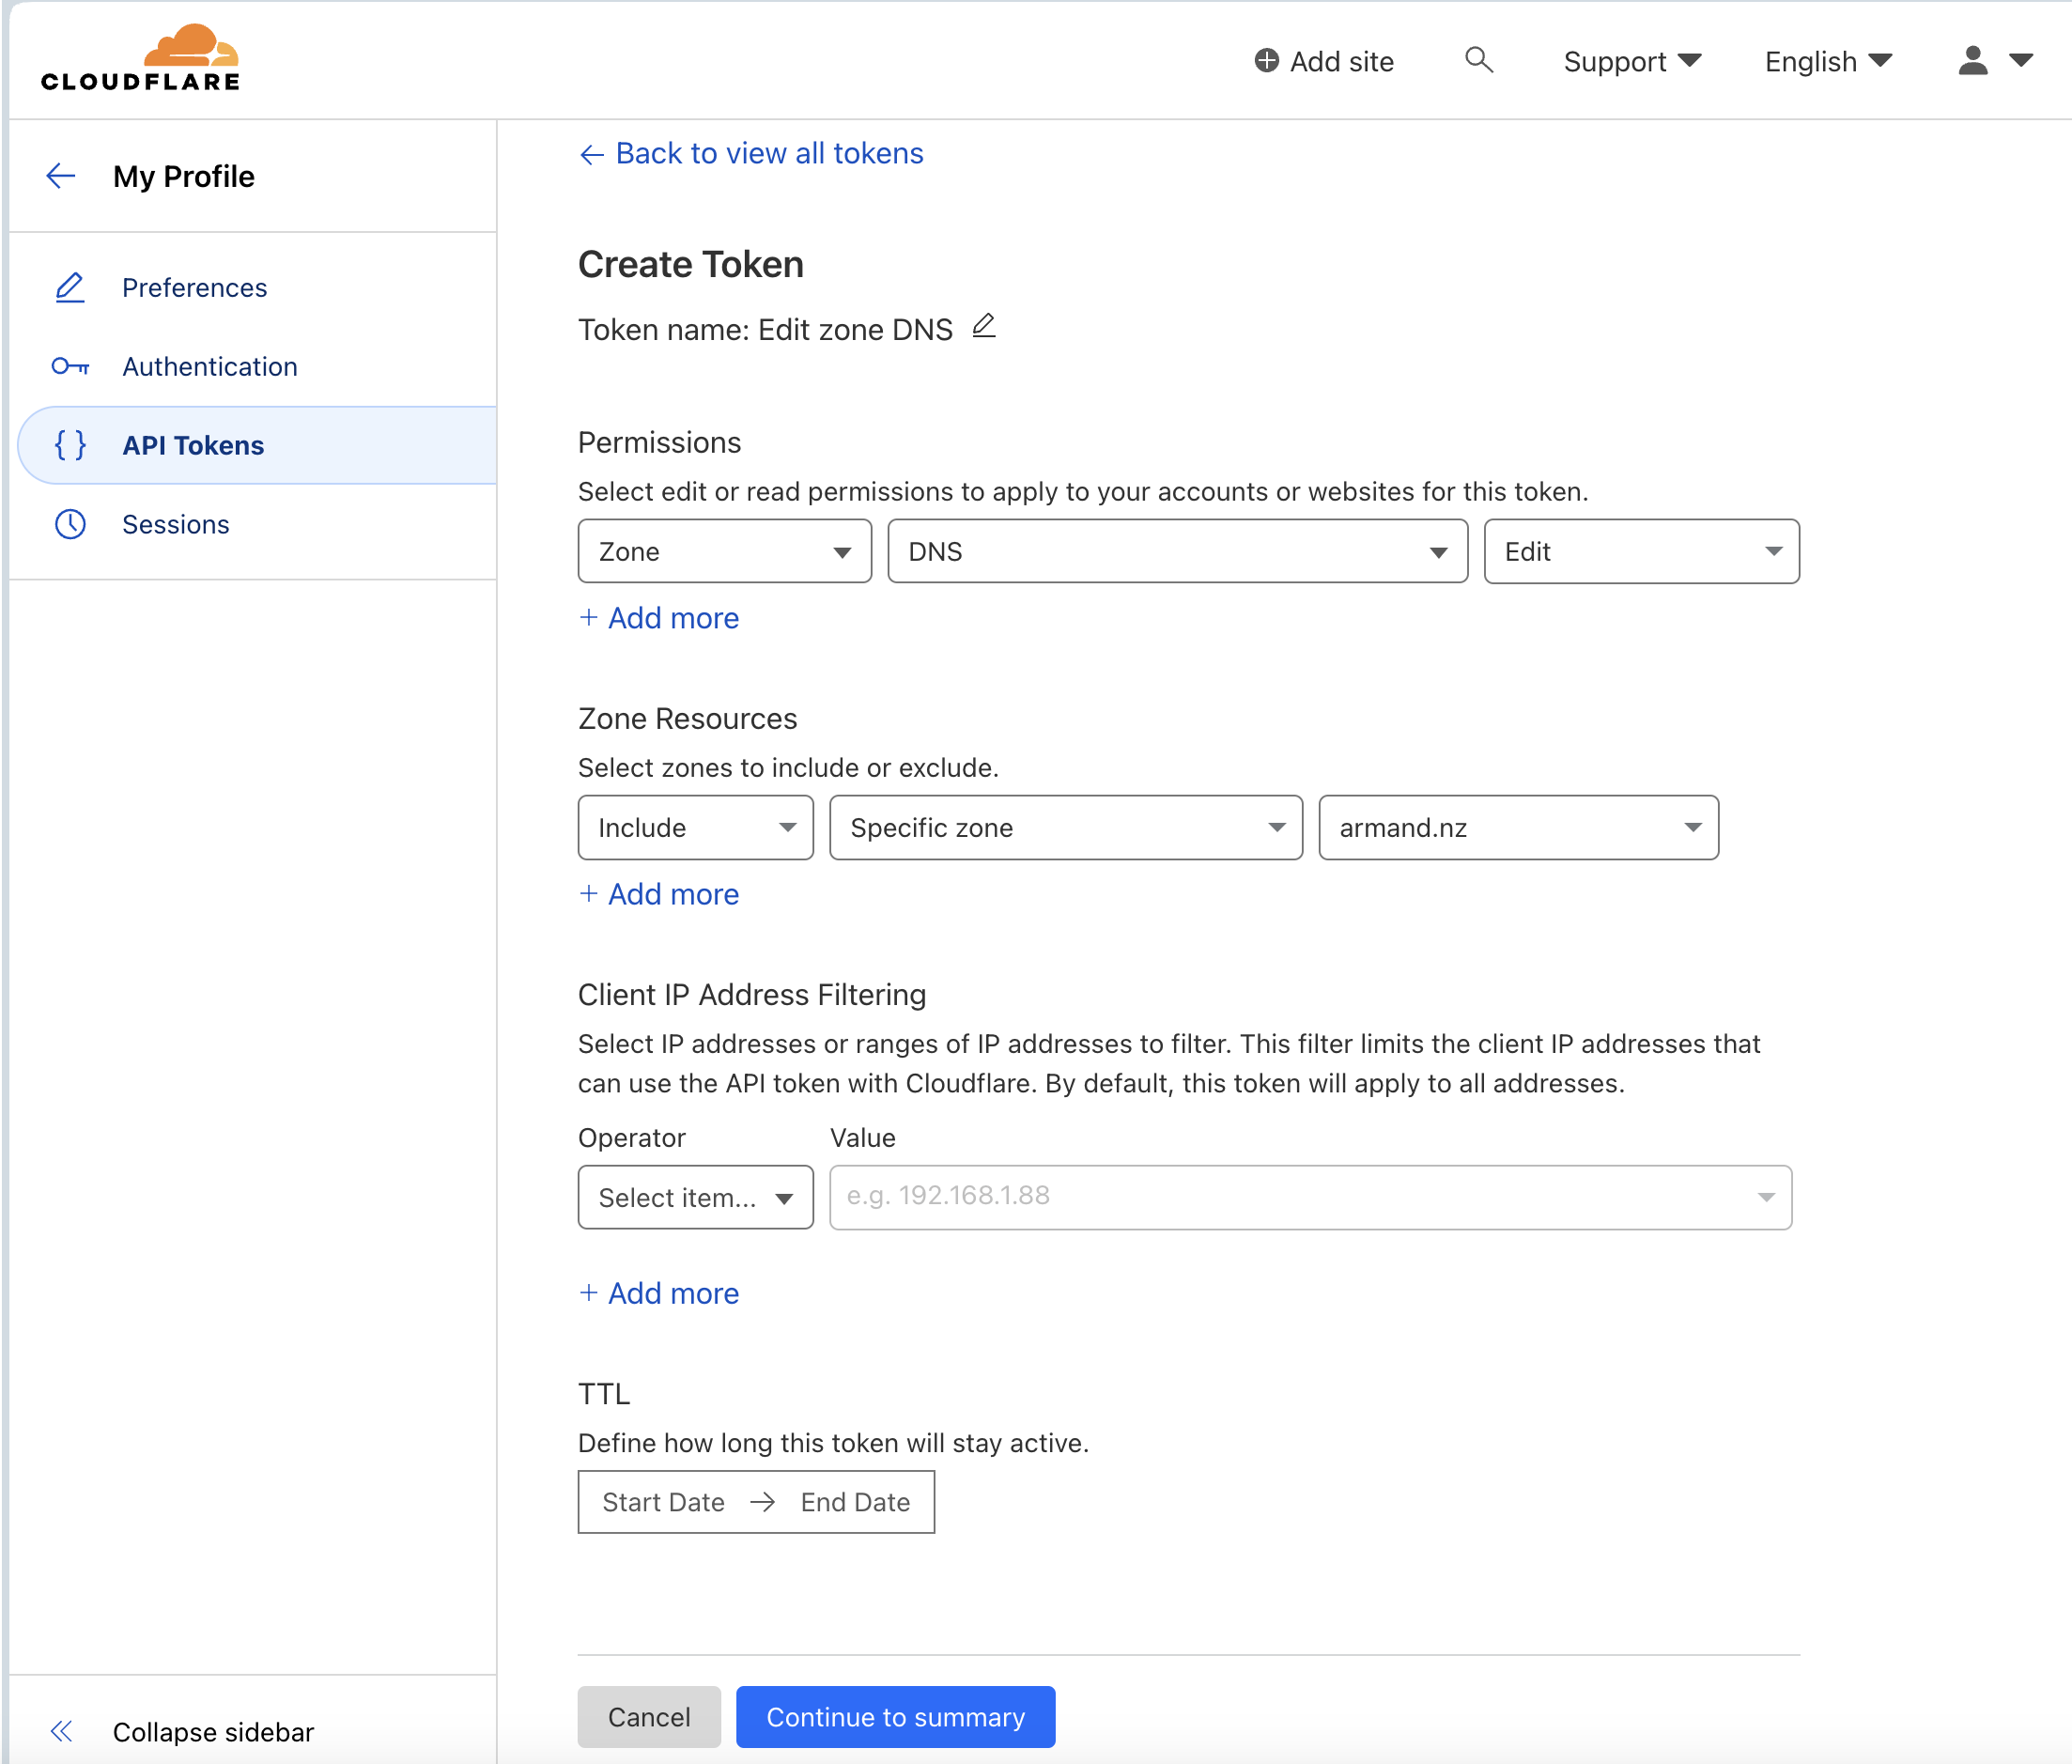
Tokens can be created at
My Profile > API Tokens > API Tokens/Keys. The following settings are recommended:Permissions:
- Zone - DNS - Edit
- Zone - Zone - Read Zone Resources:
- Include - All Zones
Make a note of your API token for the next step.

- Validate your Cloudflare token first
export API_TOKEN=XXXXXXX

curl -X GET "https://api.cloudflare.com/client/v4/user/tokens/verify" \
     -H "Authorization: Bearer $API_TOKEN" \
     -H "Content-Type:application/json"

# Example response
{"result":{"id":"6b1a8662f0cc3fc362048a8ff77ff179","status":"active"},"success":true,"errors":[],"messages":[{"code":10000,"message":"This API Token is valid and active","type":null}]}
- Before creating a new Issuer, we must make a Kubernetes
secretcontaining your new API token. You can substitute the placeholder${API_TOKEN}in this template, also shown below:
apiVersion: v1
kind: Secret
metadata:
  name: cloudflare-api-token
type: Opaque
stringData:
  api-token: ${API_TOKEN}
For example,
# download the template into a temp file
curl https://gist.githubusercontent.com/armsultan/a20192c5f7520267f424f3d9eede5aed/raw/f2f01d23803255330a315f05786dc3d5078f6c5e/cloudflare-api-token.yaml -o  cloudflare-api-token.yaml.temp

# substitute the placeholder with your API token
export API_TOKEN=XXXXXXXXXXXXXXXXXX

envsubst < cloudflare-api-token.yaml.temp \
             > cloudflare-api-token.yaml

# delete the temp file
rm cloudflare-api-token.yaml.temp
- Apply the manifest file to create the
secret
# Create new secret
kubectl apply -f cloudflare-api-token.yaml -n cert-manager

# Check its been deployed
kubectl get secrets -n cert-manager
TIP: If you have sealed secrets, you should convert this secret to a sealedsecret:
# Convert secret to a sealedsecret (use cluster-wide so we can deploy to another namespace)
kubeseal --scope cluster-wide -f cloudflare-api-token.yaml -w sealedsecret.yaml
# Deploy it
kubectl apply -f sealedsecret.yaml -n cert-manager
# Delete the plain text secret from disk
rm cloudflare-api-key.yaml
# Check its been deployed
kubectl get secrets -n cert-manager
Alternative: Create a Secret with our Cloudflare API key
Not recommended as Global API Key has a Global Scope. For documentation purposes, see below:
For more details, See Cloudflare acme setup from cert-manager documentation.
-
API Keys can be retrueved at `My Profile > API TokKeysens > Global API Key - View > Enter your Password to view
-
Before creating a new Issuer, we must make a Kubernetes
secretcontaining your new API token. You can substitute the placeholder${API_TOKEN}in this template, also shown below:
apiVersion: v1
kind: Secret
metadata:
  name: cloudflare-api-key
type: Opaque
stringData:
  api-key: ${API_KEY}
For example,
# download the template into a temp file
curl https://gist.githubusercontent.com/armsultan/9134601789ec2bd699d5137f94c6deb2/raw/e75e6d90c2b13bfbb39590c23a2792612ada5e62/cloudflare-api-key.yaml -o  cloudflare-api-key.yaml.temp

# substitute the placeholder with your API token
export API_KEY=XXXXXXXXXXXXXXXXXD

envsubst < cloudflare-api-key.yaml.temp \
             > cloudflare-api-key.yaml

# delete the temp file
rm cloudflare-api-key.yaml.temp
- Apply the manifest file to create the
secret
# Create new secret
kubectl apply -f cloudflare-api-key.yaml -n cert-manager

# Check its been deployed
kubectl get secrets -n cert-manager
TIP: If you have sealed secrets, you should convert this secret to a sealedsecret:
# Convert secret to a sealedsecret (use cluster-wide so we can deploy to another namespace)
kubeseal --scope cluster-wide -f cloudflare-api-key.yaml -w sealedsecret.yaml
# Deploy it
kubectl apply -f sealedsecret.yaml -n cert-manager
# Delete the plain text secret from disk
rm cloudflare-api-key.yaml
# Check its been deployed
kubectl get secrets -n cert-manager
Create ClusterIssuer for Issuing certificates
Issuers and clusterissuers are the backbone for supplying certificates to your cluster. Right now, with just the basic Cert-Manager setup we’ve done, it’s not yet ready to start creating certificates. So by hooking up Issuers and clusterissuers configured for Let’s Encrypt, we can get our cluster to automatically grab new certificates for our services. This way, we’re gearing up for some real action in certificate management.
Now that we have our Cloudflare API token secret that is required for DNS01 ACME, we can now create our ClusterIssuer
Unlike a namespace-scoped Issuer, a ClusterIssuer is cluster-scoped, and doesn’t require placement in the same namespace as the Certificate. *Note: To reference a namespace-scoped Issuer (a variant of ClusterIssuer), use ‘kind: Issuer’ and set a namespace .
We will create ClusterIssuer for Production and Staging:
- ClusterIssuer for Staging: Used for testing and development, obtaining untrusted certificates from a CA’s test environment. Useful for avoiding production rate limits and for testing configurations.
- ClusterIssuer for Production: Used to obtain real, trusted TLS certificates from a certificate authority (CA) for live, user-facing environments. Subject to strict rate limits.
ClusterIssuer for Staging
- Create a manifest file to create the
ClusterIssuerfor Staging. You can use this template, also shown below:
apiVersion: cert-manager.io/v1
kind: ClusterIssuer
metadata:
  name: letsencrypt-staging
spec:
  acme:
    server: https://acme-staging-v02.api.letsencrypt.org/directory
    email: ${EMAIL} # CHANGE ME
    privateKeySecretRef:
      name: letsencrypt-staging
    solvers:
      - dns01:
          cloudflare:
            apiTokenSecretRef:
              name: cloudflare-api-token #or cloudflare-api-key
              key: api-token # or api-key
For example,
# download the template into a temp file
curl https://gist.githubusercontent.com/armsultan/ede9422b3aa9ff6cc31ce3547c894140/raw/dc0bba7583b9e8efa15d46d60b124cb5b1cea2c0/staging-clusterissuer-dns01.yaml -o  staging-clusterissuer-dns01.yaml.temp

# Then, substitute the placeholder with your API token
export [email protected]

envsubst < staging-clusterissuer-dns01.yaml.temp  \
             > staging-clusterissuer-dns01.yaml

# delete the temp file
rm staging-clusterissuer-dns01.yaml.temp
- Apply the manifest file to create the
ClusterIssuerfor Staging.
kubectl apply -f staging-clusterissuer-dns01.yaml -n cert-manager
ClusterIssuer for Production
- Create a manifest file to create the
ClusterIssuerfor Production. You can use this template, also shown below:
apiVersion: cert-manager.io/v1
kind: ClusterIssuer
metadata:
  name: letsencrypt-prod
spec:
  acme:
    server: https://acme-v02.api.letsencrypt.org/directory
    email: ${EMAIL} # CHANGE ME
    privateKeySecretRef:
      name: letsencrypt-prod
    solvers:
      - dns01:
          cloudflare:
            apiTokenSecretRef:
              name: cloudflare-api-token #or cloudflare-api-key
              key: api-token # or api-key
For example,
# download the template into a temp file
curl https://gist.githubusercontent.com/armsultan/8024dd6e6eef379cda88cffe699f4ba1/raw/eac26ccd585b872207d5d8f8b89bbf7b6a446917/production-clusterissuer-dns01.yaml -o production-clusterissuer-dns01.yaml.temp

# substitute the placeholder with your API token
export [email protected]

envsubst < production-clusterissuer-dns01.yaml.temp  \
             > production-clusterissuer-dns01.yaml

# delete the temp file
rm production-clusterissuer-dns01.yaml.temp
- Apply the manifest file to create the
ClusterIssuerfor Staging.
kubectl apply -f production-clusterissuer-dns01.yaml -n cert-manager
Check they have been deployed
- Check both
letsencrypt-stagingandletsencrypt-prodare ready
kubectl get clusterissuer -n cert-manager

# Example output
NAME                  READY   AGE
letsencrypt-staging   True    5m43s
letsencrypt-prod      True    69s
Validation
Once our certificate has been obtained, cert-manager will periodically check its validity and attempt to renew it if it gets close to expiry. cert-manager considers certificates to be close to expiry when the ‘Not After’ field on the certificate is less than the current time plus 30 days.
1. Create and Verify a Let’s Encrypt certificate.
We can create a ClusterIssuer to verify the creation of a staging Let’s Encrypt certificate. This is an example; the certificate will possess a common name of lab.armand.nz, with Subject Alternative Names (SANs) including one.lab.armand.nz and two.lab.armand.nz These SANs are the only ones that TLS clients will recognize. In our setup, the certificate refers to the letsencrypt-staging ClusterIssuer.
To reference a namespace-scoped Issuer (a variant of ClusterIssuer), add ‘kind: Issuer’ to the issuerRef section and ensure it is in the same namespace as the certificate.
- Apply this manifest for creating a
Certificateusing ourletsencrypt-stagingClusterIssuer. The manifest is also shown below:
apiVersion: v1
kind: Namespace
metadata:
  name: verify-cert-manager
---
apiVersion: cert-manager.io/v1
kind: Certificate
metadata:
  name: test.demo.cequence.ai
  namespace: verify-cert-manager
spec:
  secretName: lab-armand-nz-tls
  issuerRef:
    kind: ClusterIssuer
    name: letsencrypt-staging # or letsencrypt-prod
  commonName: lab.armand.nz
  dnsNames:
  - lab.armand.nz # The CommonName must be also listed as a dnsName
  - one.lab.armand.nz
  - two.lab.armand.nz
For example,
# download the file
curl https://gist.githubusercontent.com/armsultan/e7c37813cfdd7eb2d7e716c0c9dbccbe/raw/a541a40bc99a06afa49f1530ca6307c805ba24f4/test-certificate.yaml -o test-certificate.yaml

# Edit if needed

# Then, Apply the manifest and create certificate
kubectl apply -f test-certificate.yaml
- Check it has been created
kubectl get certificate -n verify-cert-manager

NAME            READY   SECRET              AGE
lab.armand.nz   True    lab-armand-nz-tls   6s
- After creating the above Certificate, we can check whether it has been obtained successfully using
kubectl describe:
kubectl describe certificate lab.armand.nz -n verify-cert-manager


# Example output
Name:         lab.armand.nz
Namespace:    verify-cert-manager
Labels:       <none>
Annotations:  <none>
API Version:  cert-manager.io/v1
Kind:         Certificate
Metadata:
  Creation Timestamp:  2024-01-12T21:59:49Z
  Generation:          1
  Resource Version:    4318245
  UID:                 90d6e0c8-2d01-47bf-8c4e-3e697d20bd06
Spec:
  Common Name:  lab.armand.nz
  Dns Names:
    lab.armand.nz
    one.lab.armand.nz
    two.lab.armand.nz
  Issuer Ref:
    Kind:       ClusterIssuer
    Name:       letsencrypt-staging
  Secret Name:  lab-armand-nz-tls
Status:
  Conditions:
    Last Transition Time:  2024-01-12T21:59:49Z
    Message:               Certificate is up to date and has not expired
    Observed Generation:   1
    Reason:                Ready
    Status:                True
    Type:                  Ready
  Not After:               2024-04-11T20:58:55Z
  Not Before:              2024-01-12T20:58:56Z
  Renewal Time:            2024-03-12T20:58:55Z
Events:                    <none>
- We can also confirm the resulting
secretand also check whether issuance was successful withkubectl get secretand-o yaml. You should see a base64 encoded signed TLS key pair
kubectl describe secret lab-armand-nz-tls   -n verify-cert-manager


# Example output
Name:         lab-armand-nz-tls
Namespace:    verify-cert-manager
Labels:       <none>
Annotations:  cert-manager.io/alt-names: lab.armand.nz,one.lab.armand.nz,two.lab.armand.nz
              cert-manager.io/certificate-name: test.demo.cequence.ai
              cert-manager.io/common-name: lab.armand.nz
              cert-manager.io/ip-sans:
              cert-manager.io/issuer-group:
              cert-manager.io/issuer-kind: ClusterIssuer
              cert-manager.io/issuer-name: letsencrypt-staging
              cert-manager.io/uri-sans:

Type:  kubernetes.io/tls

Data
====
tls.key:  1675 bytes
tls.crt:  5705 bytes
# Get secret name
kubectl get secret -n verify-cert-manager

NAME                TYPE                DATA   AGE
lab-armand-nz-tls   kubernetes.io/tls   2      3m20s


# Inspect secret
kubectl describe secret lab-armand-nz-tls -n verify-cert-manager


# Example output
Name:         lab-armand-nz-tls
Namespace:    verify-cert-manager
Labels:       <none>
Annotations:  cert-manager.io/alt-names: lab.armand.nz,one.lab.armand.nz,two.lab.armand.nz
              cert-manager.io/certificate-name: test.demo.cequence.ai
              cert-manager.io/common-name: lab.armand.nz
              cert-manager.io/ip-sans:
              cert-manager.io/issuer-group:
              cert-manager.io/issuer-kind: ClusterIssuer
              cert-manager.io/issuer-name: letsencrypt-staging
              cert-manager.io/uri-sans:

Type:  kubernetes.io/tls

Data
====
tls.key:  1675 bytes
tls.crt:  5705 bytes


# Get the output
kubectl get secret lab-armand-nz-tls -n verify-cert-manager -oyaml
#...very long base64 encoded text included in the output\
- We have validated that we can create certificates. We can discard the certificate and secret by deleting our temporary
namespace
kubectl delete namespace verify-cert-manager
2. Create and Verify a Let’s Encrypt certificate with a Test Application.
If your cluster includes an Ingress Controller, we’ll verify our Let’s Encrypt staging and production certificate by routing a test application.
- Apply this manifest for deploying test applications (“sun” and “moon”) with ingress, using the staging certificate for the sun and the production certificate for the moon. This all-in-one manifest is shown below:
apiVersion: v1
kind: Namespace
metadata:
  name: verify-cert-manager
---
apiVersion: apps/v1
kind: Deployment
metadata:
  name: moon
  namespace: verify-cert-manager
spec:
  selector:
    matchLabels:
      app: moon
  replicas: 3
  template:
    metadata:
      labels:
        app: moon
    spec:
      containers:
        - name: moon
          image: armsultan/solar-system:moon-nonroot
          ports:
            - containerPort: 8080
---
apiVersion: apps/v1
kind: Deployment
metadata:
  name: sun
  namespace: verify-cert-manager
spec:
  selector:
    matchLabels:
      app: sun
  replicas: 3
  template:
    metadata:
      labels:
        app: sun
    spec:
      containers:
        - name: sun
          image: armsultan/solar-system:sun-nonroot
          ports:
            - containerPort: 8080
---
apiVersion: v1
kind: Service
metadata:
  name: sun-service
  namespace: verify-cert-manager
  labels:
    app: sun
spec:
  type: ClusterIP
  selector:
    app: sun
  ports:
    - port: 80
      targetPort: 8080
      protocol: TCP
---
apiVersion: v1
kind: Service
metadata:
  name: moon-service
  namespace: verify-cert-manager
  labels:
    app: moon
spec:
  type: ClusterIP
  selector:
    app: moon
  ports:
    - port: 80
      targetPort: 8080
      protocol: TCP
---
apiVersion: networking.k8s.io/v1
kind: Ingress
metadata:
  name: sun-ingress
  namespace: verify-cert-manager
  annotations:
    cert-manager.io/cluster-issuer: letsencrypt-staging # or letsencrypt-prod
    kubernetes.io/tls-acme: "true"
    nginx.ingress.kubernetes.io/proxy-buffer-size: 16k
spec:
  ingressClassName: nginx
  tls:
    - hosts:
        - sun.test.demo.cequence.ai
      secretName: sun-t3st-org-tls
  rules:
    - host: sun.test.demo.cequence.ai
      http:
        paths:
          - pathType: Prefix
            path: "/"
            backend:
              service:
                name: sun-service
                port:
                  number: 80
---
apiVersion: networking.k8s.io/v1
kind: Ingress
metadata:
  name: moon-ingress
  namespace: verify-cert-manager
  annotations:
    cert-manager.io/cluster-issuer: letsencrypt-prod
    kubernetes.io/tls-acme: "true"
    nginx.ingress.kubernetes.io/proxy-buffer-size: 16k
spec:
  ingressClassName: nginx
  tls:
    - hosts:
        - moon.test.demo.cequence.ai
      secretName: moon-t3st-org-tls
  rules:
    - host: moon.test.demo.cequence.ai
      http:
        paths:
          - pathType: Prefix
            path: "/"
            backend:
              service:
                name: moon-service
                port:
                  number: 80
For example,
# download the file
curl https://gist.githubusercontent.com/armsultan/518e249f7f5c18442e7b8008095375cc/raw/72b288cf615953f4b1cefbf1b90d535f1825f168/verify-certmanager-app.yaml -o verify-certmanager-app.yaml

# Edit if needed

# Then, Apply the manifest and create the app
kubectl apply -f verify-certmanager-app.yaml
- Find the ingress and external IP addresses
kubectl get ingress -n verify-cert-manager


# Example output
NAME           CLASS   HOSTS                ADDRESS           PORTS     AGE
sun-ingress    nginx   sun.lab.armand.nz    192.168.111.200   80, 443   17s
moon-ingress   nginx   moon.lab.armand.nz   192.168.111.200   80, 443   17s
- Let’s test it. It works with curl. We must use the
-kflag as we are using an “invalid” (test only) staging certificate only Note: If the client does not send SNI, you will get a “fake” certificate back. i.e
The Sun application uses the Staging clusterissuer:
export EXTERNALIP=192.168.111.200
export HOSTNAME=sun.lab.armand.nz

# Expect to see " Issuer: C = US, O = (STAGING) Let's Encrypt, CN = (STAGING) "
 openssl s_client \
	-showcerts -servername $HOSTNAME \
	-connect $EXTERNALIP:443 \
	| openssl x509 -noout -text | grep Issuer:

# Example output
Issuer: O=Acme Co, CN=Kubernetes Ingress Controller Fake Certificate
export EXTERNALIP=192.168.111.200
export HOSTNAME=sun.lab.armand.nz

# This curl command Reports insecure cert (regardless of prod or staging)
curl https://$EXTERNALIP -H "Host: $HOSTNAME"

# Example output
curl: (60) SSL certificate problem: self-signed certificate
The Moon application uses the prod clusterissuer:
export EXTERNALIP=192.168.111.200
export HOSTNAME=moon.lab.armand.nz

# You will NOT expect "STAGING" under "Issuer"
 openssl s_client \
	-showcerts -servername $HOSTNAME \
	-connect $EXTERNALIP:443 \
	| openssl x509 -noout -text | grep Issuer:
export EXTERNALIP=192.168.111.200
export HOSTNAME=moon.lab.armand.nz

# This curl command Reports insecure cert (regardless of prod or staging)
curl https://$EXTERNALIP -H "Host: $HOSTNAME"

# Example output
curl: (60) SSL certificate problem: self-signed certificate
Clean up
- After finishing testing, remove the
verify-cert-managernamespace and all its resources
kubectl delete namespace verify-cert-manager