Suppose you already have a QCOW2 file to use it in Proxmox, either coming from another KVM system or converted from another format. In that case, you need to import it because you cannot copy the files directly into the storage location.
To do so, you must either copy the qcow2 file to your local file system or mount it remotely via NFS, SSH, or a comparable mechanism so that you may convert the file directly.
-
SCP Image onto Proxmox host
This process assumes you’ll be using
SCPto get the remoteQCOW2file on the Proxmox host. You need to ensure the correct size of disk space is available locally on the Proxmox server. - SSH to the Proxmox server
- Check disk space on pve-root using
df -h pwdto make sure you’re in root-
A temporary directory, e.g.
/tmp/vmimportwill be used. We can remove this file laterroot@pve:~# mkdir -p /tmp/vmimport -
scpfile into/root/vm.importi.e.# From Desktop scp Snapt_v2.0-qcow2 [email protected]:/tmp/vmimportAt this point the remote QCOW2 backup file is on the Proxmox server on pve-root in the
/root/vmimportfolder. -
Now we can importation the image into the Promox host:
qm importdisk <vmid> yourimage.qcow2 namestoragepoolIn my example it lookes like:
cd /root/vmimport
qm importdisk 117 Snapt_v2.0-qcow2 storage
This will take a bit of time as it has to copy the entire filesystem block by block. The
<vmid>is just the numerical ID of the VM (you should have created a VM before getting started.) This is a number like 100, 101, etc.This works for many formats other than qcow2 as well. A straight block image in ISO / img format will work just fine, too. You will often see that when using dd to take a block image of an LVM snapshot.
-
After being imported, you might not see the storage in your hardware. Just rescan for it.
qm rescan -
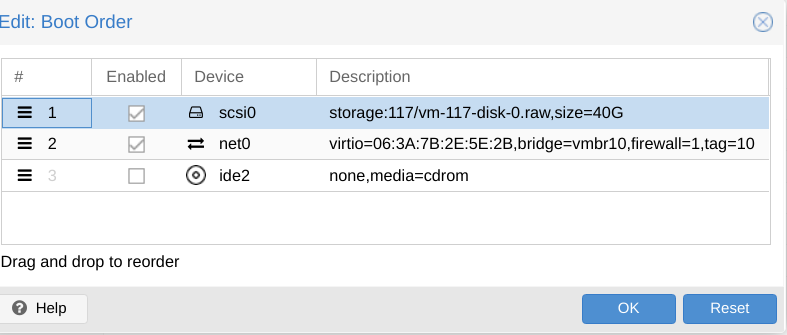
Remember to set the boot order to allow the VM to boot the newly imported image first