
*This post documents my rebuild of my minilab k3s cluster by introducing an intel-based master/worker node and using Cilium as my CNI. You can see my previous post about my original build, using only Raspberry Pi nodes, Flannel CNI, and metalLB here, Kubernetes Cluster on Raspberry Pi using Ubuntu 22.04 LTS, K3s, and MetalLB
Building a Kubernetes cluster on Raspberry Pi is a great way to get started with Kubernetes and K3s is a great choice for a Lightweight Kubernetes implementation for Raspberry Pi. The post documents my experience setting up a k3s cluster on Raspberry Pi using Ubuntu 22.04.
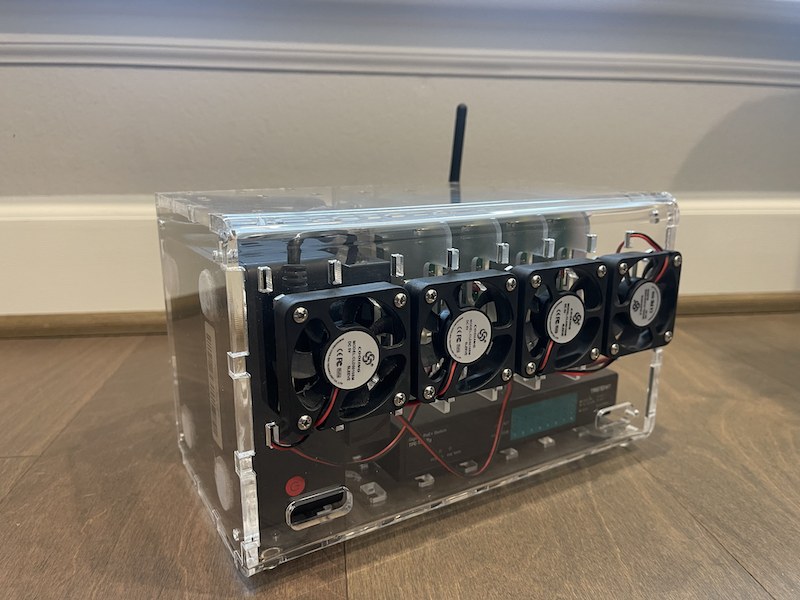
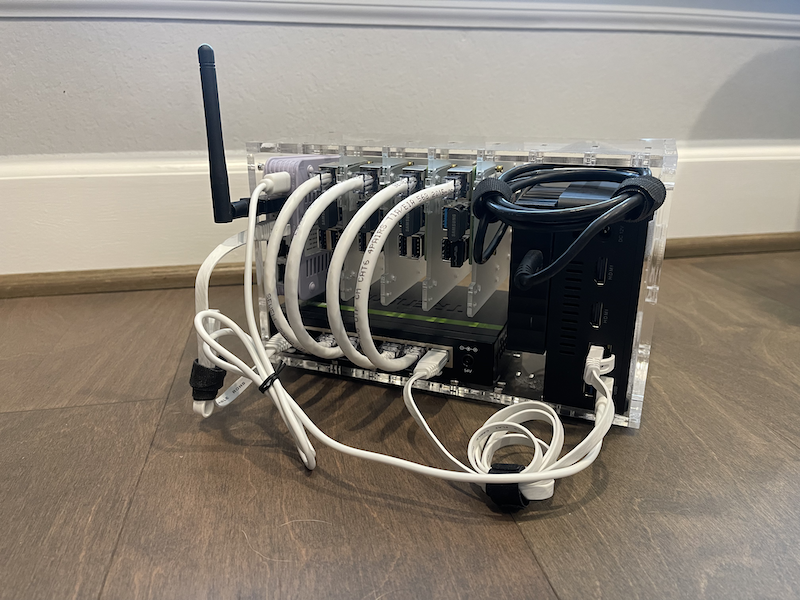
Here are some shots of the cluster’s physical build
Introduction
Why Raspberry Pi?
The Raspberry Pi is a Single-Board Computer (SBC) that was originally designed as an educational tool to help people learn how to code, but it has since become very popular in the hardware and hacking communities, with people using the device for hardware projects, home automation, robotics, and other applications.
It is a fun way to learn Kubernetes and Cilium and an excuse to tinker with physical computers again.
Why Ubuntu?
Ubuntu is a popular Linux distribution on PCs, and it is available as a pre-built release for the Raspberry Pi.
The most important reason I am using Ubuntu for this project is my experience with the Linux distribution. cloud-init is a significant benefit since we can establish the initial setup (creating SSH keys for the default user and installing necessary software) without requiring additional monitors or laborious manual processes.
The OS is not the most important piece of this project; you should use whatever Linux distribution you prefer on the Raspberry PI.
At the time of writing, Ubuntu 22.04 is the latest LTS release of Ubuntu. Find out the release date and the release schedule, find out what’s new in this release, and more.
Why K3s?
Initially, I had to set up “Kubernetes the hard way” on a Raspberry PI, and it was an excellent opportunity to prepare for my CKA. However, I ran into difficulties with my Raspberry PI’s OS wiping itself off cheap microSDs (which I threw away) and it was a pain going through all of the manual steps to re-deploy my Kubernetes cluster.
K3s is a lightweight “stripped-down” version of the Kubernetes Distribution, which is compatible and suitable for Raspberry Pi hardware because it is quick to install. In fact, K3s have been designed to work on ARM systems. Its simplicity makes it a breeze to install/remove/re-install when things go wrong.
Why Cilium for Kubernetes networking?
Cilium, a Kubernetes CNI, revolutionizes Kubernetes networking with its enhanced features, superior performance, and robust security capabilities. Its uniqueness stems from the injection of eBPF programs into the Linux kernel, creating a cloud-native compatible networking layer that utilizes Kubernetes identities over IP addresses. This, coupled with the ability to bypass parts of the network stack, results in improved performance.
Cilium has garnered strong community backing and its evolution as a CNCF project is evident by its widespread use across various industries such as media, finance, and search. Its maturity and reliability have led to its inclusion in the Kubernetes services of major cloud providers like Google, Amazon, and Microsoft.
As an open-source software, Cilium provides comprehensive network security without compromising performance. Its L7 network policies offer unprecedented control and security, while its emerging service mesh implementation enhances network management capabilities. It’s particularly beneficial for rich application delivery in home-lab setting
Hardware Used for my cluster
We need a few Raspberry Pi Single-Board Computers to construct our Raspberry PI Kubernetes cluster. I paid $75 for each Raspberry Pi 4 Model B (8GB memory) in 2020. With more or fewer instances, you may create a smaller or larger Kubernetes cluster.
Generally, We need
- Raspberry PIs: Obviously, any computer would do, but Raspberry PIs make for a cheap (?) and fun project. I suggest starting with at least two, so your programs may continue functioning if one node fails. In my situation, I’m utilizing a Raspberry Pi 4 (4GB) with 8GB RAM, which has greater “horsepower” than previous models.
- Power: Depending on the board, you’ll need a power supply, or a Raspberry Pi 4 requires a 5V 3A USB C/Type-C Power Supply Adapter, which shouldn’t cost more than $10. However, I am using Raspberry Pi PoE+ HAT modules and a switch with POE to power the devices.
- Micro-SD card: To run the operating system on each board, we’ll need a Micro-SD card of at least 16GB, and these are available for as low as $5 per piece. However, I recommend spending a little more on reputable options to save you the headache of malfunctioning and slow cards. I opted for the SanDisk Extreme Pro and went for the 64GB capacity for more storage flexibility.
- Optional - A portable hard drive or USB thumb drives: Because the Kubernetes Cluster will run applications (containers) on any of our hosts, we must establish a shared drive between them. I took this opportunity to experiment with GlusterFS replicated storage and NFS share, so I got a USB3 thumb drive per Raspberry PI.
- *Optional - A *Spare Intel PC? **This gives your cluster some flexibility to spin up containers that are not compiled for ARM64
- Ethernet Cables: Because our host machines need access to a network and the Internet. I recommend using Ethernet rather than WIFI. In my case, I’m powering my Raspberry PIs with POE anyway, so I make sure my ethernet cables can support that.
- Ethernet Switch (optional): Small-form routers typically have four to eight Ethernet ports, so you won’t need to use them all, but if you want to add or expand your network with additional equipment, eight ports are a good number. A POE capably Ethernet switch like this one can cost around $80
- Case with cooling fan (recommended): Finally, cooling fans and heatsinks are also highly recommended to keep the CPU cool and reduce the risk of hardware failure due to overheating. I am using this case.
I used the following building components (at prices in 2020):
- 1 x Beelink Mini PC8GB , e.g A more recent # Intel 12th Gen Alder Lake is for $139.00 USD
- 4 x Raspberry Pi 4 Model B/8GB @ $75.00 USD each for a total of $300.00 USD
- 4 x Raspberry Pi PoE+ HAT @ $20.00 USD each for a total of $80 USD
- 1 X 8-Port GREENnet Gigabit PoE+ Switch for $80 USD
- 8 Slot Cluster Cloudlet for Raspberry Pi 4B for $65 USD
- 4 x SanDisk Extreme Pro 64GB Micro Memory Card for $20 USD = $80USD
- Optional (GlusterFS): SAMSUNG FIT Plus 128GB - 400 MB/s USB 3.1 Flash Drive for $20 USD = $80USD
- A few short ethernet cables I already had
-
For my NFS, I had a spare external Hard drive available.
Total = $685 or $824 with an additional new intel PC
All my components were purchased from Pi Shop Amazon, and eBay
Operating System Overview
We must first set up and configure the Ubuntu Linux Operating System on each node of the future Kubernetes cluster.
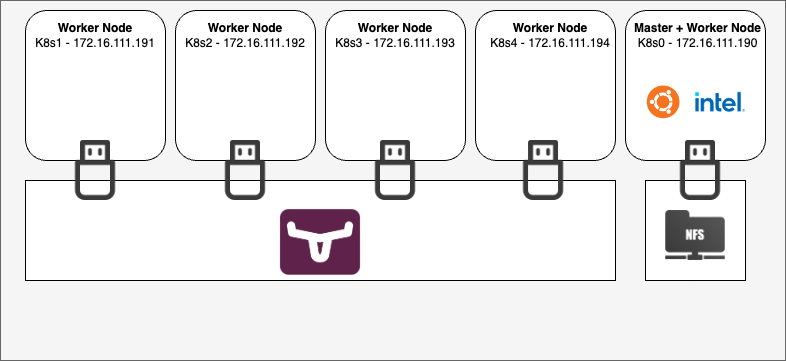
Our cluster will include four machines (I mean the same thing when I saw a Raspberry PI device, a machine, a node, or a host), with each computer having its own name and IP address
- k8s0 - Master Node (
172.16.222.190) - k8s1 - Worker Node (
172.16.222.191) - k8s2 - Worker Node (
172.16.222.192) - k8s3 - Worker Node (
172.16.222.193) - k8s4 - Worker Node (
172.16.222.194)
The Master Node is the cluster’s primary node, in charge of orchestration. Although uncommon in a multi-node cluster, the Master Node may also function as a worker and execute apps if required.
A Worker node is dedicated to running our applications. It is controlled by the master node from a distance. Our worker node is a computer dedicated to running applications only. The master node remotely manages it.
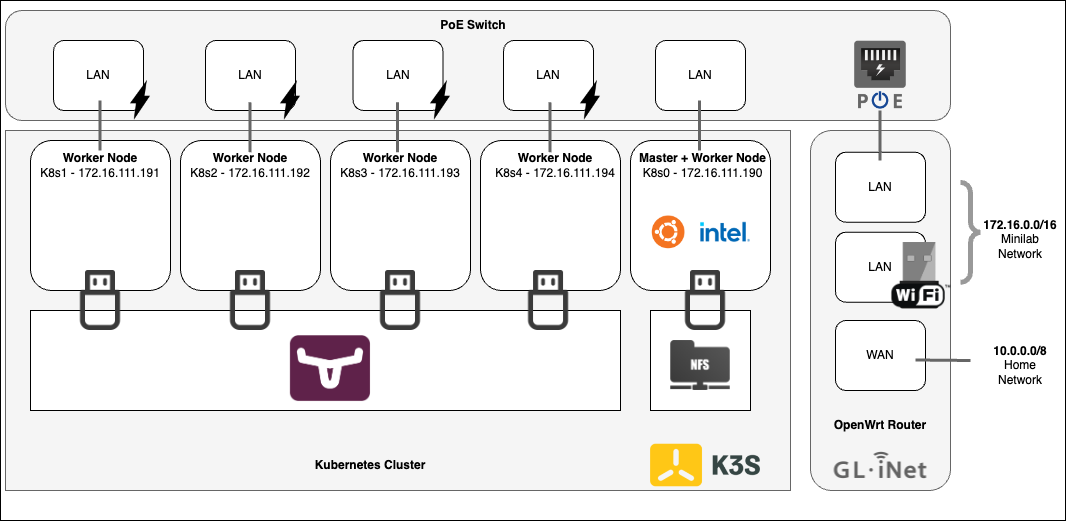
This is my setup:
And for a more verbose view:
Install OS on the k3s nodes
In my lab, my worker nodes are Raspberry PIs and so i will install ubuntu on it
Flash Ubuntu OS onto the Micro SD cards
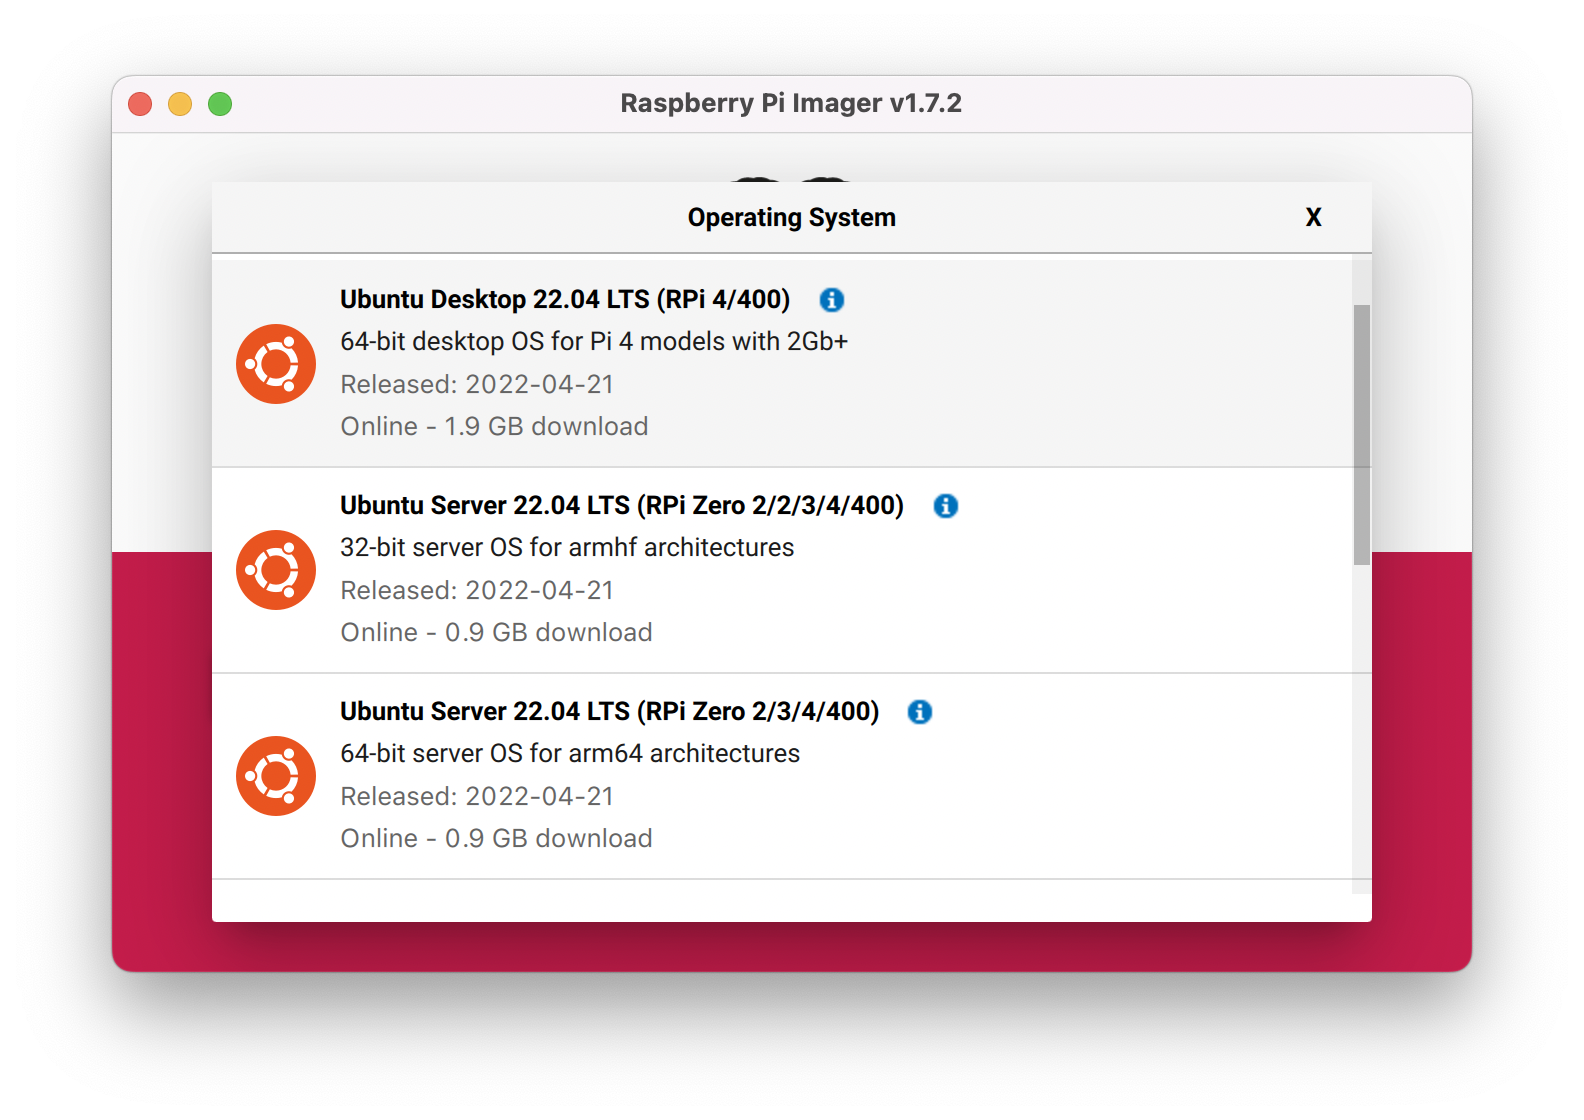
I’m running Ubuntu Server 22.04 LTS 64bit. This version does not include a Desktop or Recommended package. Using this edition, we may begin with a completely clean, light, and fresh installation.
Raspberry Pi Imager is the easiest way to Install Raspberry Pi OS onto your SD card, and you can download and install the Target Ubuntu OS from the tool.
- Open Raspberry PI imager > Other General Purpose OS > Ubuntu > Ubuntu Server 22.04 LTS - make sure to select 64bit
-
Plug a Micro SD Card into your local machine where you are running Raspberry PI imager
-
Select the target Micro SD and ‘WRITE’
Configuring your instance during boot
Once the SD Cards are flashed with the Ubuntu, re-mount the SD Card if necessary (eject and re-insert to your machine), open the SD card with your file manager, and edit the two files user-data and cmdline.txt to set an initial configuration to the raspberry pi systems with a static IP address, hostname, and install some prerequisites software.
As a reference or template to edit from, here are two files used:
user-data, andcmdline.txt
Edit cmdline.txt
- Inspect the
cmdline.txtfile. There likely won’t be anything required to be modified here. note that the Kubernetes install prerequisites have already been appended to the boot command line:
cgroup_enable=cpuset cgroup_enable=memory cgroup_memory=1
Check out my cmdline.txt as an example, also shown blow:
console=serial0,115200 dwc_otg.lpm_enable=0 console=tty1 root=LABEL=writable rootfstype=ext4 rootwait fixrtc quiet splash cgroup_enable=cpuset cgroup_enable=memory cgroup_memory=1
Add user-data user specific configurations (consistent on all nodes)
Edit the user-data file for your _user specific configurations (consistent on all nodes)
If you are not familiar with this file, feel free to inspect and use my example, user-data as a template to edit from. Take a look at the file and comments, here are some user specific configurations in my example:
- Change the following to your needs
Feel free to add your own parameters to build your own setup.
user-data other specific configurations (unique per machine)
Further edit the user-data for your _node-specific configurations (specific machine nodes)
-
For each node, change any node specific details -
hostnameandfqdn:hostname: k8s0 fqdn: k8s0.lab.armand.nz -
For each node, change the node specific details of network interface configurations, i.e, static IP Address(es)
NOTE: I have set one DNS server and dns relay on the router so that I can set exactly one DNS.
IMPORTANT: Known Issue: Kubelet in Kubernetes supports no more than three DNS server entries in /etc/resolv.conf on each node in the cluster.
- path: /etc/netplan/50-cloud-init.yaml # Set Static IP
  permissions: '0644'
  content: |
    network:
	version: 2
	ethernets:
		eth0:
		dhcp4: no
		addresses:
			- 172.16.222.191/24
        routes:
          - to: default
            via: 172.16.222.1
		nameservers:
			search: [lab.armand.nz]
			addresses: [172.16.222.1]
- For each node, change the host file entries in the host file. i.e., hostname and static IP Address assignment
- path: /etc/hosts # Hosts files
content: |
127.0.0.1 localhost k8s1 k8s1.lab.armand.nz
::1 localhost
172.16.222.2 dns dns.lab.armand.nz
172.16.222.190 k8s0 k8s0.lab.armand.nz
172.16.222.191 k8s1 k8s1.lab.armand.nz
172.16.222.192 k8s2 k8s2.lab.armand.nz
172.16.222.193 k8s3 k8s3.lab.armand.nz
Cloud-init lets you do a lot. You may set up network configurations, ssh keys, and public keys for immediate SSH remote access, go the extra mile of setting up Kubernetes and k3s prerequisites or even completely build out your system from scratch. Refer to the online documentation for details on all options.
In my setup (user-data), I added a few tools for convenience and some cosmetic items like MOTD. Most importantly, though, is enabling SSH access so we avoid plugging in a monitor and keyboard to configure each node. Adding a non-root admin user with sudo access is also recommended. I’ll perform the other configurations manually for documentation purposes, like installing k3s and other Kubernetes tools.
Fire up the Raspberry PIs and connect via SSH
We’ll try to connect from our local computer to the node via SSH after each device has been powered up. If you’re using Linux, MacOS, or a similar system, all you have to do is open a new terminal. Windows users can use Putty as an SSH client if they download and install it.
The following steps need to be done on each Raspberry PI node. Using a tool like TMUX and its Synchronize Panes feature makes this process easy in one go. This magical tool is not covered here, but you can learn more about it here.
In the last step, we set the default user (“ubuntu”) password, a static IP address, a unique Hostname, and static entries in the host files. We now assume we can access and each Node via ssh can communicate with each other via hostname resolution; therefore, we can skip these basic network and user configurations.
Note: If you use DHCP, Your router will assign an arbitrary IP address when a device tries to join the network. To find the address attributed to the device, you can check either on your router admin panel or via a tool like netstat or angryIP
Install linux-modules-extra-raspi extra package
Through lots of frustration, In earlier attempts to do this project in 2020, I discovered Ubuntu installations were missing a kernel module that always resulted in STATUS: NotReady when my Kubernetes K3S was installed - This may no longer be an issue in 2023 however, I install this kernel module again this round, and I able to finally get my Ubuntu Raspberry Pi modules to a STATUS: Ready state on the first install.
On each Raspberry PI, Install the linux-modules-extra-raspi extra package, a specific requirement for Ubuntu 21.10+ and k3s on Raspberry Pis
-
Run the following to install the module.
sudo apt install linux-modules-extra-raspi sudo reboot -
A reboot is required to take effect:
sudo reboot
After the reboot, we will be good to go to install K3s
Setup the Master k3s Node
The Master node’s (k8s0) initial k3s installation will serve as the control plane for our Kubernetes Cluster. I disabled the load balancer service Klipper and Traefik ingress and balancer in my install because I prefer the option to use non-bundled solutions such as Cilium and NGINX ingress, which, in my opinion, provide more features.
For Cilium, we need to install your k3s cluster as you normally would but make sure to disable support for the default CNI plugin and the built-in network policy enforcer so you can install Cilium on top
- Install
K3swith the flags to make sure/etc/rancher/k3s/k3s.yamlis world-readable and serviceloadBalancer,Klipper, andtraefikare disabled, and for Cilium,flannel-backend=none
export K3S_KUBECONFIG_MODE="644"
export INSTALL_K3S_EXEC=" --flannel-backend=none --disable-network-policy --disable servicelb --disable traefik"
curl -sfL https://get.k3s.io | sh -

[INFO] Finding release for channel stable
[INFO] Using v1.23.6+k3s1 as release
[INFO] Downloading hash https://github.com/k3s-io/k3s/releases/download/v1.23.6+k3s1/sha256sum-amd64.txt
[INFO] Downloading binary https://github.com/k3s-io/k3s/releases/download/v1.23.6+k3s1/k3s
[INFO] Verifying binary download
[INFO] Installing k3s to /usr/local/bin/k3s
[INFO] Skipping installation of SELinux RPM
[INFO] Skipping /usr/local/bin/kubectl symlink to k3s, already exists
[INFO] Creating /usr/local/bin/crictl symlink to k3s
[INFO] Skipping /usr/local/bin/ctr symlink to k3s, command exists in PATH at /usr/bin/ctr
[INFO] Creating killall script /usr/local/bin/k3s-killall.sh
[INFO] Creating uninstall script /usr/local/bin/k3s-uninstall.sh
[INFO] env: Creating environment file /etc/systemd/system/k3s.service.env
[INFO] systemd: Creating service file /etc/systemd/system/k3s.service
[INFO] systemd: Enabling k3s unit
Created symlink /etc/systemd/system/multi-user.target.wants/k3s.service → /etc/systemd/system/k3s.service.
[INFO] systemd: Starting k3s
- Check if the
k3sservice installed successfully,:
systemctl status k3s

● k3s.service - Lightweight Kubernetes
Loaded: loaded (/etc/systemd/system/k3s.service; enabled; vendor preset: enabled)
Active: active (running) since Tue 2022-05-24 10:48:12 MDT; 36s ago
Docs: https://k3s.io
Process: 1979 ExecStartPre=/bin/sh -xc ! /usr/bin/systemctl is-enabled --quiet nm-cloud-setup.service (code=exited, status=0/SUCCESS)
Process: 1981 ExecStartPre=/sbin/modprobe br_netfilter (code=exited, status=0/SUCCESS)
Process: 1982 ExecStartPre=/sbin/modprobe overlay (code=exited, status=0/SUCCESS)
Main PID: 1983 (k3s-server)
Tasks: 88
Memory: 803.5M
CPU: 55.037s
CGroup: /system.slice/k3s.service
├─1983 /usr/local/bin/k3s server
├─2004 containerd -c /var/lib/rancher/k3s/agent/etc/containerd/config.toml -a /run/k3s/containerd/containerd.sock --state /run/k3s/containerd --root /var/lib/rancher/k3s/agent>
├─2588 /var/lib/rancher/k3s/data/8c2b0191f6e36ec6f3cb68e2302fcc4be850c6db31ec5f8a74e4b3be403101d8/bin/containerd-shim-runc-v2 -namespace k8s.io -id 1a9d266ca9f4ce8e62b49294ce5>
├─2613 /var/lib/rancher/k3s/data/8c2b0191f6e36ec6f3cb68e2302fcc4be850c6db31ec5f8a74e4b3be403101d8/bin/containerd-shim-runc-v2 -namespace k8s.io -id 7ede00e8f0dc750dc8c92ae15ea>
└─2643 /var/lib/rancher/k3s/data/8c2b0191f6e36ec6f3cb68e2302fcc4be850c6db31ec5f8a74e4b3be403101d8/bin/containerd-shim-runc-v2 -namespace k8s.io -id 8a589604b9b0183db0d109d1e44>
- You can check if the master node is working. At this point, there is only one Master node
Note: Since we have not installed a CNI Yet, STATUS remains “NotReady”
k3s kubectl get node

NAME STATUS ROLES AGE VERSION
k8s0 NotReady control-plane,master 75s v1.23.6+k3s1
Connect to your K3s Kubernetes Config on the Master node
In order to manage the Kubernetes cluster, you have to let kubectl know where to find the kubeconfig. You can do this by either specifying the kubeconfig file as an environment variable or copying it to the default path at ~/.kube/config. Here we do the latter
-
Copy
k3s.yamlto~/.kube/configmkdir -p ~/.kube cp /etc/rancher/k3s/k3s.yaml ~/.kube/config kubectl get nodes -
k3salso installed the Kubernetes Command Line Tools, so it is now possible to start querying the cluster usingkubectlas it looks for the Kubernetes config at~/.kube/configby default
Note: Since we have not installed a CNI Yet, STATUS remains “NotReady”
```bash
kubectl get nodes

NAME STATUS ROLES AGE VERSION
k8s0 NotReady control-plane,master 3m50s v1.23.6+k3s1
```
If Applicable: Allow ports on the firewall
If you have a firewall (ufw) enabled we need to enable ports for worker nodes to communicate over
- Enable ports on
ufw
# We need to allow ports that will will be used to communicate between the master and the worker nodes. The ports are 443 and 6443.
sudo ufw allow 6443/tcp
sudo ufw allow 443/tcp
Prepare token for adding working nodes
You need to extract the K3S_TOKEN from the Master node that will be used to join the Worker nodes to the Master Node.
- On the Master node, make a node of the
k3sjoin token
sudo cat /var/lib/rancher/k3s/server/node-token
You will then obtain a token that looks like:
K10ece08566d244124d69992b0eb597a378f7ba029dea9829c8392e12501505b33b::server:66e9859c7190d8aab493f150f78b6333
Install k3s on Worker nodes and connect them to the Master Node
The next step is to install k3s on the Kubernetes Worker nodes (k8s1, k8s2, k8s3 and k8s4). We will install k3s while providing the join token. Remember to replace the Master node IP address and token with your specific deployment
- Set variables for
K3S_URLandK3S_TOKENand run thek3sinstallation script. Since I have static IPs configured on each node, I reference the Master node’s IP address instead of the DNS Name (though, both work if DNS Host entries are configured correctly)
# curl -sfL https://get.k3s.io | K3S_URL=https://<master_IP>:6443 K3S_TOKEN=<join_token> sh -s
export K3S_KUBECONFIG_MODE="644"
export K3S_URL="https://172.16.222.190:6443"
export K3S_TOKEN="K103cc1634360ddec824fd7....f642752ec928419bf949f29bb::server:cbba...."
curl -sfL https://get.k3s.io | sh -
- We can verify if the
k3s-agenton the Worker nodes is running by:
sudo systemctl status k3s-agent
- If the service failed to start, you may need to restart and check again:
sudo systemctl restart k3s-agent
sudo systemctl status k3s-agent

● k3s-agent.service - Lightweight Kubernetes

Loaded: loaded (/etc/systemd/system/k3s-agent.service; enabled; vendor preset: enabled)
Active: active (running) since Tue 2022-05-24 11:59:49 CDT; 465ms ago
Docs: https://k3s.io
Process: 4620 ExecStartPre=/bin/sh -xc ! /usr/bin/systemctl is-enabled --quiet nm-cloud-se>
Process: 4622 ExecStartPre=/sbin/modprobe br_netfilter (code=exited, status=0/SUCCESS)
Process: 4623 ExecStartPre=/sbin/modprobe overlay (code=exited, status=0/SUCCESS)
Main PID: 4624 (k3s-agent)
Tasks: 8
Memory: 18.5M
CPU: 829ms
CGroup: /system.slice/k3s-agent.service
└─4624 "/usr/local/bin/k3s " "" "" "" "" ""
May 24 11:59:49 k8s2 systemd[1]: Starting Lightweight Kubernetes...
May 24 11:59:49 k8s2 sh[4620]: + /usr/bin/systemctl is-enabled --quiet nm-cloud-setup.service
May 24 11:59:49 k8s2 sh[4621]: Failed to get unit file state for nm-cloud-setup.service: No su>
May 24 11:59:49 k8s2 systemd[1]: Started Lightweight Kubernetes.
- **Initial Check: **To verify that our Worker nodes have successfully been added to the
k3scluster, run thiskubectlcommand back on the Master Node wherekubectlhas been installed
You can see that all nodes are in status NotReady. This is because we have yet to install a CNI plugin and normal pods can not run without a pod network. We will install Cilium CNI next
kubectl get nodes -o wide
# or
k3s kubectl get nodes -o wide

kubectl get nodes
NAME      STATUS   ROLES                  AGE     VERSION
k8s1      NotReady    <none>                 4h43m   v1.27.7+k3s2
k8s4      NotReady    <none>                 4h43m   v1.27.7+k3s2
beelink   NotReady    control-plane,master   5h34m   v1.27.7+k3s2
k8s3      NotReady    <none>                 4h43m   v1.27.7+k3s2
k8s2      NotReady    <none>                 4h43m   v1.27.7+k3s2
Connect remotely to the k3s cluster from your local machine
Using kubectl we can manage our Kubernetes cluster remotely from a our local machine. If you have not done so already, make sure you have installed kubetl by following the instructions on the Kubernetes documentation, e.g. Install kubectl binary with curl on Linux
The following steps now assume you have Installed kubectl on your local machine and are managing other Kubernetes clusters, so we will merge and add the new cluster to the local config (e.g. ~./kube/config)
By default, the k3s cluster is called “default” and if you already have a Kubernetes cluster on your local machine named “default, we won’t be able to merge our new k3s cluster config with our existing Kubernetes configuration. While there are several approaches to resolving this, the following is one, and will delete the existing conflicting “default” cluster configuration before merging our new k3s config:
- Add our new Kubernetes cluster config to the local machine. In this example, I replace localhost
127.0.0.1with the remote address of the master node172.16.222.190and replace my “default” cluster by first deleting the existing cluster config
# Copy Kube config from master node to local machine
scp [email protected]:~/.kube/config otherconfig

# Replace 127.0.0.1 with external IP or Hostname
sed -i '' 's/127\.0\.0\.1/10\.0\.0\.190/g' otherconfig

# Backup current kube config
cp ~/.kube/config ~/.kube/config_BACKUP
# Delete potential conflicting "default" cluster config
kubectl config delete-cluster default
# Merge config
konfig=$(KUBECONFIG=~/.kube/config:otherconfig kubectl config view --flatten)
echo "$konfig" > ~/.kube/config
- If you get an error “
WARNING: Kubernetes configuration file is group-readable. This is insecure. Location: /Users/xxx/.kube/config”. you can set the correct permissions:
chmod go-r ~/.kube/config
- Change
kubectlcluster context to k3s (“default”)
# Get a list of Kubernetes clusters in your local Kube config
kubectl config get-clusters

NAME
default
do-sfo2-doks-armand-sfo2
docker-desktop
arn:aws:eks:us-west-2:832984185795:cluster/eks-armand-uswest2

# Set context to our k3s cluster "default"
kubectl config use-context default

# Check which context you are currently targeting
kubectl config current-context

# Get Nodes in the target Kubernetes cluster
kubectl get nodes

kubectl get nodes
NAME      STATUS   ROLES                  AGE   VERSION
k8s0   Ready    control-plane,master   26h   v1.23.6+k3s1
k8s1      Ready    <none>                 26h   v1.23.6+k3s1
k8s2      Ready    <none>                 26h   v1.23.6+k3s1
k8s3      Ready    <none>                 26h   v1.23.6+k3s1
Install Cilium
This step is required for production environments but optional for testing and development. It allows the
cilium-agentto pin eBPF resources to a persistent filesystem and make them persistent across restarts of the agent
- A portable way to achieve this with persistence is to add the following line to
/etc/fstaband then runmount /sys/fs/bpf. This will cause the filesystem to be automatically mounted when the node boots. On each k3s node, run the following:
sudo mount bpffs -t bpf /sys/fs/bpf

sudo bash -c 'cat <<EOF >> /etc/fstab
none /sys/fs/bpf bpf rw,relatime 0 0
EOF'


# Reload fstab
sudo systemctl daemon-reload
sudo systemctl restart local-fs.target
- check
/etc/fstab:
cat /etc/fstab

# you should see:
none /sys/fs/bpf bpf rw,relatime 0 0
Install the Cilium with helm
From [Cilium documentation]: The Cilium CLI can be used to install Cilium, inspect the state of a Cilium installation, and enable/disable various features (e.g., cluster mesh, Hubble).
I prefer using a Helm chart to set up Cilium because it’s simpler and better suited for production environments. Although I struggled with the Cilium CLI approach, it is probably because I didn’t read the manual :-p
Cilium Installation Tips and here is where I got the following instructions and helms values to deploy Cilium with helm
helm repo add cilium https://helm.cilium.io/
helm repo update
export CILIUM_NAMESPACE=cilium
export VERSION=1.15.1

# FOR SINGLE NODE, SET operator.replicas=1
# NOTE: The `tunnel` option (deprecated in Cilium 1.14) has been removed. To enable native-routing mode, set `routingMode=native` (previously `tunnel=disabled`).

helm upgrade --install cilium cilium/cilium \
	--version $VERSION \
	--create-namespace \
	--namespace $CILIUM_NAMESPACE \
	--set operator.replicas=1 \
	--set ipam.operator.clusterPoolIPv4PodCIDRList=10.42.0.0/16 \
	--set ipv4NativeRoutingCIDR=10.42.0.0/16 \
	--set ipv4.enabled=true \
	--set loadBalancer.mode=dsr \
	--set kubeProxyReplacement=strict \
	--set routingMode=native \
	--set autoDirectNodeRoutes=true \
	--set hubble.relay.enabled=true \
	--set hubble.ui.enabled=true \
	--set l2announcements.enabled=true
- Wait for Cilium to finish install (this may take a while)
# Watch and wait
export CILIUM_NAMESPACE=cilium
watch kubectl get pods -n $CILIUM_NAMESPACE

NAME                               READY   STATUS    RESTARTS   AGE
cilium-operator-5dbf5bb4d9-p4qhx   1/1     Running   0          93s
cilium-l8dpr                       1/1     Running   0          93s
cilium-pc98m                       1/1     Running   0          93s
cilium-j4hn2                       1/1     Running   0          93s
cilium-22n6s                       1/1     Running   0          93s
cilium-p7jx5                       1/1     Running   0          93s
hubble-ui-7b4457996f-8j7x6         2/2     Running   0          93s
hubble-relay-687cddf98f-snfjc      1/1     Running   0          93s
- Install the Cilium CLI on the master node
CILIUM_CLI_VERSION=$(curl -s https://raw.githubusercontent.com/cilium/cilium-cli/main/stable.txt)
CLI_ARCH=amd64
if [ "$(uname -m)" = "aarch64" ]; then CLI_ARCH=arm64; fi
curl -L --fail --remote-name-all https://github.com/cilium/cilium-cli/releases/download/${CILIUM_CLI_VERSION}/cilium-linux-${CLI_ARCH}.tar.gz{,.sha256sum}
sha256sum --check cilium-linux-${CLI_ARCH}.tar.gz.sha256sum
sudo tar xzvf cilium-linux-${CLI_ARCH}.tar.gz /usr/local/bin
rm cilium-linux-${CLI_ARCH}.tar.gz{,.sha256sum}
- Validate the Installation that was done with helm using cilium cli
export CILIUM_NAMESPACE=cilium
cilium status --wait -n $CILIUM_NAMESPACE

    /¯¯\
 /¯¯\__/¯¯\    Cilium:             OK
 \__/¯¯\__/    Operator:           OK
 /¯¯\__/¯¯\    Envoy DaemonSet:    disabled (using embedded mode)
 \__/¯¯\__/    Hubble Relay:       OK
    \__/       ClusterMesh:        disabled

Deployment             cilium-operator    Desired: 1, Ready: 1/1, Available: 1/1
DaemonSet              cilium             Desired: 5, Ready: 5/5, Available: 5/5
Deployment             hubble-ui          Desired: 1, Ready: 1/1, Available: 1/1
Deployment             hubble-relay       Desired: 1, Ready: 1/1, Available: 1/1
Containers:            cilium             Running: 5
                       cilium-operator    Running: 1
                       hubble-ui          Running: 1
                       hubble-relay       Running: 1
Cluster Pods:          21/21 managed by Cilium
Helm chart version:    1.15.1
Image versions         hubble-relay       quay.io/cilium/hubble-relay:v1.15.1@sha256:3254aaf85064bc1567e8ce01ad634b6dd269e91858c83be99e47e685d4bb8012: 1
                       cilium             quay.io/cilium/cilium:v1.15.1@sha256:351d6685dc6f6ffbcd5451043167cfa8842c6decf80d8c8e426a417c73fb56d4: 5
                       cilium-operator    quay.io/cilium/operator-generic:v1.15.1@sha256:819c7281f5a4f25ee1ce2ec4c76b6fbc69a660c68b7825e9580b1813833fa743: 1
                       hubble-ui          quay.io/cilium/hubble-ui:v0.13.0@sha256:7d663dc16538dd6e29061abd1047013a645e6e69c115e008bee9ea9fef9a6666: 1
                       hubble-ui          quay.io/cilium/hubble-ui-backend:v0.13.0@sha256:1e7657d997c5a48253bb8dc91ecee75b63018d16ff5e5797e5af367336bc8803: 1
-
Validate the Installation that was done with helm using
kubectlWe will see two components here:
-
Cilium Operator: The Cilium Operator is designed to oversee specific duties within the cluster that are more effectively managed across the entire cluster, instead of duplicating these tasks on every individual node.
-
Cilium Pods: Positioned on each Linux container host, the Cilium agent (
cilium-agent) handles the intricate configuration aspects concerning network security and service-level visibility. This agent keeps an eye on the container runtime for container start and stop events, and creates custom BPF (Berkeley Packet Filter) programs in response. These BPF programs are then employed by the Linux kernel to manage and control all network traffic to and from the containers.Everything is in a Running state and all looks well:
export CILIUM_NAMESPACE=cilium
watch kubectl get pods -n $CILIUM_NAMESPACE

NAME                               READY   STATUS    RESTARTS   AGE
cilium-operator-5dbf5bb4d9-p4qhx   1/1     Running   0          93s
cilium-l8dpr                       1/1     Running   0          93s
cilium-pc98m                       1/1     Running   0          93s
cilium-j4hn2                       1/1     Running   0          93s
cilium-22n6s                       1/1     Running   0          93s
cilium-p7jx5                       1/1     Running   0          93s
hubble-ui-7b4457996f-8j7x6         2/2     Running   0          93s
hubble-relay-687cddf98f-snfjc      1/1     Running   0          93s
**Note:** While you can see there are no pods with "agent" in their names if you check the pod logs, you can see that the `pod cilium-XXXX` is a cilium-agent.

```bash
export CILIUM_NAMESPACE=cilium
kubectl logs -n $CILIUM_NAMESPACE --timestamps cilium-shfk9 | head -1
```
-
Run the following command to validate that your cluster has proper network connectivity:
 export CILIUM_NAMESPACE=cilium
 cilium connectivity test -n $CILIUM_NAMESPACE

 # Example
 cilium connectivity test -n $CILIUM_NAMESPACE
 ℹ️  Monitor aggregation detected, will skip some flow validation steps
 ✨ [default] Creating namespace cilium-test for connectivity check...
 ✨ [default] Deploying echo-same-node service...
 ✨ [default] Deploying DNS test server configmap...
 ✨ [default] Deploying same-node deployment...
 ✨ [default] Deploying client deployment...
 ✨ [default] Deploying client2 deployment...
 ✨ [default] Deploying echo-other-node service...
 ✨ [default] Deploying other-node deployment...
 ✨ [host-netns] Deploying default daemonset...
 ✨ [host-netns-non-cilium] Deploying default daemonset...
 ℹ️  Skipping tests that require a node Without Cilium
 ⌛ [default] Waiting for deployment cilium-test/client to become ready...
 ⌛ [default] Waiting for deployment cilium-test/client2 to become ready...
 ⌛ [default] Waiting for deployment cilium-test/echo-same-node to become ready...
 ⌛ [default] Waiting for deployment cilium-test/echo-other-node to become ready...
 ⌛ [default] Waiting for CiliumEndpoint for pod cilium-test/client2-646b88fb9b-85gsw to appear...
 ⌛ [default] Waiting for CiliumEndpoint for pod cilium-test/client-6b4b857d98-lgrzc to appear...
 ⌛ [default] Waiting for pod cilium-test/client-6b4b857d98-lgrzc to reach DNS server on cilium-test/echo-same-node-557b988b47-zqw4c pod...
 ⌛ [default] Waiting for pod cilium-test/client2-646b88fb9b-85gsw to reach DNS server on cilium-test/echo-same-node-557b988b47-zqw4c pod...
 ⌛ [default] Waiting for pod cilium-test/client2-646b88fb9b-85gsw to reach DNS server on cilium-test/echo-other-node-78455455d5-btgll pod...
 ⌛ [default] Waiting for pod cilium-test/client-6b4b857d98-lgrzc to reach DNS server on cilium-test/echo-other-node-78455455d5-btgll pod...
 ⌛ [default] Waiting for pod cilium-test/client2-646b88fb9b-85gsw to reach default/kubernetes service...
 ⌛ [default] Waiting for pod cilium-test/client-6b4b857d98-lgrzc to reach default/kubernetes service...
 ⌛ [default] Waiting for CiliumEndpoint for pod cilium-test/echo-other-node-78455455d5-btgll to appear...
 ⌛ [default] Waiting for CiliumEndpoint for pod cilium-test/echo-same-node-557b988b47-zqw4c to appear...
 ⌛ [default] Waiting for Service cilium-test/echo-same-node to become ready...
 ⌛ [default] Waiting for Service cilium-test/echo-same-node to be synchronized by Cilium pod cilium/cilium-ztnwk
 ⌛ [default] Waiting for Service cilium-test/echo-other-node to become ready...
 ⌛ [default] Waiting for Service cilium-test/echo-other-node to be synchronized by Cilium pod cilium/cilium-ztnwk
 ⌛ [default] Waiting for NodePort 172.16.222.2:30418 (cilium-test/echo-same-node) to become ready...
 ⌛ [default] Waiting for NodePort 172.16.222.2:30160 (cilium-test/echo-other-node) to become ready...
 ⌛ [default] Waiting for NodePort 172.16.222.193:30418 (cilium-test/echo-same-node) to become ready...
 ⌛ [default] Waiting for NodePort 172.16.222.193:30160 (cilium-test/echo-other-node) to become ready...
 ⌛ [default] Waiting for NodePort 172.16.222.192:30418 (cilium-test/echo-same-node) to become ready...
 ⌛ [default] Waiting for NodePort 172.16.222.192:30160 (cilium-test/echo-other-node) to become ready...
 ⌛ [default] Waiting for NodePort 172.16.222.194:30418 (cilium-test/echo-same-node) to become ready...
 ⌛ [default] Waiting for NodePort 172.16.222.194:30160 (cilium-test/echo-other-node) to become ready...
 ⌛ [default] Waiting for NodePort 172.16.222.191:30418 (cilium-test/echo-same-node) to become ready...
 ⌛ [default] Waiting for NodePort 172.16.222.191:30160 (cilium-test/echo-other-node) to become ready...
 ℹ️  Skipping IPCache check
 🔭 Enabling Hubble telescope...
 ⚠️  Unable to contact Hubble Relay, disabling Hubble telescope and flow validation: rpc error: code = Unavailable desc = connection error: desc = "transport: Error while dialing: dial tcp 127.0.0.1:4245: connect: connection refused"
 ℹ️  Expose Relay locally with:
 cilium hubble enable
 cilium hubble port-forward&
 ℹ️  Cilium version: 1.14.0
 🏃 Running tests...
 [=] Test [no-policies]
 ..................................
 [=] Test [no-policies-extra]
 ....................
 [=] Test [allow-all-except-world]
 ....................
 [=] Test [client-ingress]
 ..
 [=] Test [client-ingress-knp]
 ..
 [=] Test [allow-all-with-metrics-check]
 ....
 [=] Test [all-ingress-deny]
 ........
 [=] Test [all-ingress-deny-knp]
 ........
 [=] Test [all-egress-deny]
 ................
 [=] Test [all-egress-deny-knp]
 ................
 [=] Test [all-entities-deny]
 ........
 [=] Test [host-entity]
 ..........
 [=] Test [echo-ingress]
 ....
 [=] Test [echo-ingress-knp]
 ....
 [=] Test [client-ingress-icmp]
 ..
 [=] Test [client-egress]
 ....
 [=] Test [client-egress-knp]
 ....
 [=] Test [client-egress-expression]
 ....
 [=] Test [client-egress-expression-knp]
 ....
 [=] Test [client-with-service-account-egress-to-echo]
 ....
 [=] Test [client-egress-to-echo-service-account]
 ....
 [=] Test [to-entities-world]
 .
 ℹ️  📜 Applying CiliumNetworkPolicy 'client-egress-to-entities-world' to namespace 'cilium-test'..
 [-] Scenario [to-entities-world/pod-to-world]
 [.] Action [to-entities-world/pod-to-world/http-to-one.one.one.one-0: cilium-test/client2-646b88fb9b-85gsw (10.42.3.224) -> one.one.one.one-http (one.one.one.one:80)]
 ❌ command "curl -w %{local_ip}:%{local_port} -> %{remote_ip}:%{remote_port} = %{response_code} --silent --fail --show-error --output /dev/null --connect-timeout 2 --max-time 10 --retry 3 --retry-all-errors --retry-delay 3 http://one.one.on
 e.one:80" failed: command failed: curl: (28) Resolving timed out after 2000 milliseconds

 ℹ️  curl output:

 📄 No flows recorded for peer cilium-test/client2-646b88fb9b-85gsw during action http-to-one.one.one.one-0
 📄 No flows recorded for peer one.one.one.one-http during action http-to-one.one.one.one-0
 [.] Action [to-entities-world/pod-to-world/https-to-one.one.one.one-0: cilium-test/client2-646b88fb9b-85gsw (10.42.3.224) -> one.one.one.one-https (one.one.one.one:443)]
 [.] Action [to-entities-world/pod-to-world/https-to-one.one.one.one-index-0: cilium-test/client2-646b88fb9b-85gsw (10.42.3.224) -> one.one.one.one-https-index (one.one.one.one:443)]
 [.] Action [to-entities-world/pod-to-world/http-to-one.one.one.one-1: cilium-test/client-6b4b857d98-lgrzc (10.42.3.129) -> one.one.one.one-http (one.one.one.one:80)]
 [.] Action [to-entities-world/pod-to-world/https-to-one.one.one.one-1: cilium-test/client-6b4b857d98-lgrzc (10.42.3.129) -> one.one.one.one-https (one.one.one.one:443)]
 [.] Action [to-entities-world/pod-to-world/https-to-one.one.one.one-index-1: cilium-test/client-6b4b857d98-lgrzc (10.42.3.129) -> one.one.one.one-https-index (one.one.one.one:443)]
 ℹ️  📜 Deleting CiliumNetworkPolicy 'client-egress-to-entities-world' from namespace 'cilium-test'..
 [=] Test [to-cidr-external]
 ....
 [=] Test [to-cidr-external-knp]
 ....
 [=] Test [echo-ingress-from-other-client-deny]
 ......
 [=] Test [client-ingress-from-other-client-icmp-deny]
 ......
 [=] Test [client-egress-to-echo-deny]
 ......
 [=] Test [client-ingress-to-echo-named-port-deny]
 ....
 [=] Test [client-egress-to-echo-expression-deny]
 ....
 [=] Test [client-with-service-account-egress-to-echo-deny]
 ....
 [=] Test [client-egress-to-echo-service-account-deny]
 ..
 [=] Test [client-egress-to-cidr-deny]
 ....
 [=] Test [client-egress-to-cidr-deny-default]
 ....
 [=] Test [health]
 .....
 [=] Skipping Test [north-south-loadbalancing] (Feature node-without-cilium is disabled)
 [=] Test [pod-to-pod-encryption]
 .
 [=] Test [node-to-node-encryption]
 ...
 [=] Skipping Test [egress-gateway-excluded-cidrs] (Feature enable-ipv4-egress-gateway is disabled)
 [=] Skipping Test [pod-to-node-cidrpolicy] (Feature cidr-match-nodes is disabled)
 [=] Skipping Test [north-south-loadbalancing-with-l7-policy] (Feature node-without-cilium is disabled)
 [=] Test [echo-ingress-l7]
 ............
 [=] Test [echo-ingress-l7-named-port]
 ............
 ............
 [=] Test [client-egress-l7-method]
 ............
 [=] Test [client-egress-l7]
 ..........
 [=] Test [client-egress-l7-named-port]
 ..........
 [=] Skipping Test [client-egress-l7-tls-deny-without-headers] (Feature secret-backend-k8s is disabled)
 [=] Skipping Test [client-egress-l7-tls-headers] (Feature secret-backend-k8s is disabled)
 [=] Skipping Test [client-egress-l7-set-header] (Feature secret-backend-k8s is disabled)
 [=] Skipping Test [echo-ingress-auth-always-fail] (Feature mutual-auth-spiffe is disabled)
 [=] Skipping Test [echo-ingress-mutual-auth-spiffe] (Feature mutual-auth-spiffe is disabled)
 [=] Skipping Test [pod-to-ingress-service] (Feature ingress-controller is disabled)
 [=] Skipping Test [pod-to-ingress-service-deny-all] (Feature ingress-controller is disabled)
 [=] Skipping Test [pod-to-ingress-service-allow-ingress-identity] (Feature ingress-controller is disabled)
 [=] Test [dns-only]
 ..........
 [=] Test [to-fqdns]
 ........

 📋 Test Report
 ❌ 1/44 tests failed (1/321 actions), 12 tests skipped, 0 scenarios skipped:
 Test [to-entities-world]:
 ❌ to-entities-world/pod-to-world/http-to-one.one.one.one-0: cilium-test/client2-646b88fb9b-85gsw (10.42.3.224) -> one.one.one.one-http (one.one.one.one:80)
 connectivity test failed: 1 tests failed
Note to my future self: I was not sure why the connectivity report failed to resolve
one.one.one.one. I was able to pass this test manually on each Kubernetes node and in a test container running curl. I will need to figure this out…For example:
 $ kubectl run mycurlpod --image=curlimages/curl -i --tty -- sh
 If you don't see a command prompt, try pressing enter.
 ~ $ curl one.one.one.one
 <html>
 <head><title>301 Moved Permanently</title></head>
 <body>
 <center><h1>301 Moved Permanently</h1></center>
 <hr><center>cloudflare</center>
 </body>
 </html>
Install Hubble
- This was already enabled with my
helm installoptions. Note: to enable Hubble after deploying cilium with Helm we can do ahelm upgrade
export CILIUM_NAMESPACE=cilium
helm upgrade cilium cilium/cilium \
--namespace $CILIUM_NAMESPACE \
--reuse-values \
--set hubble.relay.enabled=true \
--set hubble.ui.enabled=true
- To access the UI, we can either port-forward to the
hubble-uiservice or use the Cilium cli to access the Hubble UI in our browser.
cilium hubble ui -n cilium
ℹ️  Opening "http://localhost:12000" in your browser...
Install Cilium LB IPAM (Load Balancer)
In version 1.13, Cilium rolls out the LoadBalancer IP Address Management (LB IPAM) feature, rendering MetalLB unnecessary. This streamlines operations by reducing the need to manage two components (CNI and MetalLB) to just one, working seamlessly with the already integrated Cilium BGP Control Plane functionality.
LB IPAM does not require explicit deployment. The IP IPAM controller automatically activates upon adding a CRD named CiliumLoadBalancerIPPool to the cluster. The following is the YAML manifest that was applied to activate this feature.
The LoadBalancer IP Address Management (LB IPAM) documentation provides several additional examples.
- Create the IPPool file, e.g.,
CiliumLoadBalancerIPPool.yaml, Where172.16.222.0/24is part of my172.16.0.0/16LAN
apiVersion: "cilium.io/v2alpha1"
kind: CiliumLoadBalancerIPPool
metadata:
  name: "lb-pool"
  namespace: Cilium
spec:
  cidrs:
  # - cidr: "172.16.222.0/24"
  - start: "172.16.222.10"
    stop: "172.16.222.150"
- Create the
CiliumLoadBalancerIPPoolby applying the manifest
kubectl create -f CiliumLoadBalancerIPPool.yaml
ciliumloadbalancerippool.cilium.io/lb-pool created
- After adding the pool to the cluster, it appears like this:
kubectl get ippools

NAME      DISABLED   CONFLICTING   IPS AVAILABLE   AGE
lb-pool   false      False         254             59s
- We can create a test service with
type: LoadBalancerreceives anEXTERNAL-IP. Create the a service manifest file, e.g.,test-lb.yaml
apiVersion: v1
kind: Service
metadata:
  name: test
spec:
  type: LoadBalancer
  ports:
  - port: 1234
- Create the
LoadBalancerservice by applying the manifest
kubectl create -f test-lb.yaml
service/test created
- Let’s see if it has an
EXTERNAL-IP
k d
NAME   TYPE           CLUSTER-IP     EXTERNAL-IP     PORT(S)          AGE
test   LoadBalancer   10.43.28.135   172.16.222.72   1234:32514/TCP   62s
As you can see, it has an external IP of `172.16.222.72`! There is no application behind this service, so there is nothing more to test other than seeing the `EXTERNAL-IP` provisioned.
L2 Announcements (No need for MetalLB!)
Although External IP addresses are provisioned by CiliumLoadBalancerIPPool in the last step, this is not yet routable on the LAN as it is not announced.
We could use Cilium BGP control plane feature (A good blog post about it here) or without any BGP configuration needed on the upstream router, we can use [L2 Announcements](https://docs.cilium.io/en/latest/network/l2-announcements/ available from Cilium version 1.14 by enabled by setting with the l2announcements.enabled=true flag:
L2 Announcements is a functionality that allows services to be seen and accessed over the local area network. This feature is mainly aimed at on-premises setups in environments that don’t use BGP-based routing, like office or campus networks. Users who had depended on MetalLB for comparable capabilities discovered they could entirely eliminate MetalLB from their configurations and streamline configurations with the Cilium CNI
l2announcements.enabled=truewas already enabled with my intial helm install. Note: to enable L2 Announcements after deploying Cilium, we can do ahelm upgrade:
export CILIUM_NAMESPACE=cilium
helm upgrade cilium cilium/cilium \
--namespace $CILIUM_NAMESPACE \
--reuse-values \
--set l2announcements.enabled=true
Next, we need a CiliumL2AnnouncementPolicy to start L2 announcements and specify where that takes place.
- Before we create a
CiliumL2AnnouncementPolicy, let’s get the network interface name of the Kubernetes nodes. On each node collect this information:
ip addr

# I see this on my raspberry pis worker nodes:
eth0
# and on my beelink master node I see:
enp1s0
-
Also get an identifying label of the worker nodes
Since k3s worker nodes do not have a role label
node-role.kubernetes.io/control-planon the worker nodes, we can use this label to instruct Cilium to do L2 announcements on worker nodes only (Since my control plane is also a worker node, this would mean L2 announcements would not get scheduled on the master node)
Name:               beelink
Roles:              control-plane,master
Labels:             beta.kubernetes.io/arch=amd64
					beta.kubernetes.io/instance-type=k3s
					beta.kubernetes.io/os=linux
					kubernetes.io/arch=amd64
					kubernetes.io/hostname=beelink
					kubernetes.io/os=linux
					node-role.kubernetes.io/control-plane=true #<--USE THIS!
					node-role.kubernetes.io/master=true
					node.kubernetes.io/instance-type=k3s
and so we will use the following in our CiliumL2AnnouncementPolicy:
nodeSelector:
	matchExpressions:
	- key: node-role.kubernetes.io/control-plane
		operator: DoesNotExist
Let’s break down the snippet:
Match Expressions: This is a section of a Kubernetes resource configuration that defines a set of conditions that must be satisfied for a certain rule to apply. In this case, it’s specifying a set of conditions for matching nodes.Key: node-role.kubernetes.io/control-plane: This is one of the conditions defined in the match expression. It specifies a key or label that Kubernetes will check on nodes.Operator: Exist: This is the operator used to evaluate the condition. In this case, it’s checking if the label with the keynode-role.kubernetes.io/control-planedoes exist on nodes - which it does on a control plane node, i.e. our single node in our cluster.
- Create the L2 Announcement policy such as
CiliumL2AnnouncementPolicy.yamlbelow:
apiVersion: cilium.io/v2alpha1
kind: CiliumL2AnnouncementPolicy
metadata:
  name: loadbalancerdefaults
  namespace: Cilium
spec:
  nodeSelector:
    matchExpressions:
      # - key: node-role.kubernetes.io/control-plane # For only control-plane
      #   operator: Exists
      - key: node-role.kubernetes.io/control-plane # For only worker nodes
        operator: DoesNotExist
      # - key: node.kubernetes.io/instance-type=k3s # All nodes
      #  operator: Exists
  interfaces:
    # - ens18
    # - enp0s18
    # - eth0
    - "eth+"
    - "enp+"
    - "ens+"
  externalIPs: true
  loadBalancerIPs: true
-
Create
CiliumL2AnnouncementPolicyby applying the manifestkubectl apply -f CiliumL2AnnouncementPolicy.yaml ciliuml2announcementpolicy.cilium.io/loadbalancerdefaults created -
Let’s confirm it’s creating the lease
kubectl describe l2announcement
Name:         loadbalancerdefaults
Namespace:
Labels:       <none>
Annotations:  <none>
API Version:  cilium.io/v2alpha1
Kind:         CiliumL2AnnouncementPolicy
Metadata:
Creation Timestamp:  2023-11-10T22:44:25Z
Generation:          2
Resource Version:    150739
UID:                 9f561431-20dd-4d97-aac7-05c827e6d4f5
Spec:
External I Ps:  true
Interfaces:
	eth0
	enp1s0
Load Balancer I Ps:  true
Node Selector:
	Match Expressions:
	Key:       node-role.kubernetes.io/control-plane
	Operator:  DoesNotExist
Events:          <none>
The leases are created in the same namespace where Cilium is deployed, in my case, `cilium`. You can inspect the leases with the following command:
kubectl get leases -n cilium

# Example output
NAME                                            HOLDER   AGE
cilium-operator-resource-lock                            2d1h
cilium-l2announce-cilium-hubble-peer            k8s3     45s
cilium-l2announce-kube-system-kube-dns          k8s1     45s
cilium-l2announce-default-test                  k8s2     45s
cilium-l2announce-cilium-hubble-relay           k8s3     45s
cilium-l2announce-cilium-hubble-ui              k8s1     46s
cilium-l2announce-cilium-test-echo-same-node    k8s3     46s
cilium-l2announce-cilium-test-echo-other-node   k8s4     46s
cilium-l2announce-kube-system-metrics-server    k8s2     45s
cilium-l2announce-default-kubernetes            k8s1     45s
cilium-l2announce-solar-system-moon-svc         k8s3     45s
Troubleshooting: If you do not get a lease (which happen to me the first time), be sure to check:
- Your
CiliumLoadBalancerIPPool(e.g.,172.16.222.0/24) is part of your LAN network (e.g.,172.16.0.0/16) - You may need to try different
nodeSelectoron yourCiliumL2AnnouncementPolicy. In My case I was able to get L2 Announcements work when on my intel master node: ``` spec: nodeSelector: matchExpressions:- key: node-role.kubernetes.io/control-plane # For only control-plane operator: Exists ```
- In a frantic state of applying all sorts of changes, You might need to try deleting
CiliumLoadBalancerIPPoolandCiliumL2AnnouncementPolicy, then reboot your Kubernetes nodes before reapplying the manifests again. - Note: Some troubleshooting notes I had referenced: https://github.com/cilium/cilium/issues/26996
Time to test: Deploy an example application
We are ready to deploy our first application if you have got this far without issues!
I have provided a yaml manifest to deploy a sample application and expose it outside your Kubernetes cluster with metal LB.
- Download
the-moon-all-in-one.yaml]
curl https://gist.githubusercontent.com/armsultan/f674c03d4ba820a919ed39c8ca926ea2/raw/c408f4ccd0b23907c5c9ed7d73b14ae3fd0d30e1/the-moon-all-in-one.yaml >> the-moon-all-in-one.yaml
- Apply the
yamlmanifest usingkubectl
kubectl apply -f the-moon-all-in-one.yaml
- We can see everything being created using the
watchcommand in combination withkubectl
kubectl get all -n solar-system -o wide

NAME                      READY   STATUS    RESTARTS   AGE   IP            NODE   NOMINATED NODE   READINESS GATES
pod/moon-d68c678d-qt84d   1/1     Running   0          54m   10.42.3.29    k8s3   <none>           <none>
pod/moon-d68c678d-9wbd2   1/1     Running   0          54m   10.42.4.150   k8s2   <none>           <none>
pod/moon-d68c678d-ggqpj   1/1     Running   0          54m   10.42.2.99    k8s4   <none>           <none>
pod/moon-d68c678d-62xch   1/1     Running   0          54m   10.42.1.76    k8s1   <none>           <none>

NAME                  TYPE           CLUSTER-IP      EXTERNAL-IP      PORT(S)        AGE   SELECTOR
service/moon-lb-svc   LoadBalancer   10.43.207.201   172.16.222.68   80:30911/TCP   54m   app=moon

NAME                   READY   UP-TO-DATE   AVAILABLE   AGE   CONTAINERS   IMAGES                                SELECTOR
deployment.apps/moon   4/4     4            4           54m   moon         armsultan/solar-system:moon-nonroot   app=moon

NAME                            DESIRED   CURRENT   READY   AGE   CONTAINERS   IMAGES                                SELECTOR
replicaset.apps/moon-d68c678d   4         4         4       54m   moon         armsultan/solar-system:moon-nonroot   app=moon,pod-template-hash=d68c678d
In the example output above, my Cilium-powered LoadBalancer and L2 announcement that has exposed my “moon” application on the IP address 172.16.222.68
curl 172.16.222.68 -s  | grep title\>
<title>The Moon</title>
…and that my friend, is that moon.
 Also note, if you want to assign a static IP address from LoadBalancer for this service you can use the
 io.cilium/lb-ipam-ips annotation this is commented out in my example manifest, you can uncomment that and apply the manifest again:
controller:
  service:
    annotations:
      io.cilium/lb-ipam-ips: 172.16.222.120
- If you would like to delete this deployment, we can simply delete everything in namespace “
solar-system”
kubectl delete namespace solar-system
We have our K3s cluster up and running with Cilium!
Storage
Storage is a necessity. For stateful applications data storage is essential. This holds true even for something as basic as a configuration file. There are a few options for K3s storage and I found an awesome summary here
I have tried GlusterFS in the past, and this time, I will try Longhorn. This is a native Kubernetes storage, now finally with support for arm64 https://github.com/longhorn/longhorn/issues/6
Next Steps to complete the Kubernetes cluster setup
Storage
- Setup, Cloud native distributed block storage for Kubernetes and Setup NFS share on k8s0 (master node):
- In preparation, we first need to Format and Mount USB Drive on Ubuntu